

I’ve recently taken on the role of Community Manager for the Canon Collective Facebook Page Group. One of the perks of the job is every now and again, I am treated to some of Canon’s products to try out.
The new Canon R5 is receiving some bold headlines, such as “Game Changer” in mirrorless technology and this is a big call. I currently shoot with a Canon 1DX, 5D IV and 5Ds and these are all exceptional cameras with some specific qualities for certain types of shooting. But if I’m totally honest, there are a few tweaks on my wish list of features to really have my “dream camera”
So when the Canon R5 showed up on my doorstep (after doing a little happy dance), I pretty much took it out of the box and headed to my local park to take it for a test run. I didn’t read the instructions. I had seen a few online reviews about some of the features so had some idea what I was wanting to try and so I figured, how hard could it be, it’s still a Canon Camera after all.
In hindsight, maybe that wasn’t the best strategy as, although many of the functions and usability is similar, there are some big differences in the operation of this camera compared to the 5D and 1D (all more user friendly once you get used to them), particularly the focusing with animal and people “eye detection” which I was super keen to try out. To be honest, I came away a little dejected. I got confused with some of the settings and kept changing the ISO and shutter speeds by mistake. Is this camera really the revolution everyone is going on about or just some great marketing by Canon? My first instinct was to just go back to my 5D. I’ve been shooting with one for over 5 yeas and could pretty much operate in my sleep.
Then I got home and downloaded the pictures! Granted, a few were out of focus, but I think that was more the fault of the driver than the machine, but the images that were in focus – WOW. The clarity and detail is truly incredible. And being a 45 mega pixel camera means you can crop and zoom in on images without losing quality. Particularly shooing wildlife on my first outing, this is a great feature as it allows you to keep your distance, but still achieve the image I was wanting.
So, I have now read more instruction manuals and reviews and spent a couple of weeks using the R5 in a variety of situations. Let me start by saying that even though I have studied photography, I am not one of those overly complex people. I find my photography more artistical than technical. Some online guidelines talked in way too technical terms and seemed to make things more complicated. When I take photos, I usually have a few settings and go to procedures I use in 90% of situations and I try and keep things simple so I can actually get on and enjoy what I am doing. I don’t really change my settings much during an actual shoot. If that’s you, here are some of my insights to get you started while you familiarise yourself with the R5. Many of the features and setups are the same as a 5D so I am assuming some knowledge and only highlighting the differences.
SOME COOL THINGS ABOUT THE R5
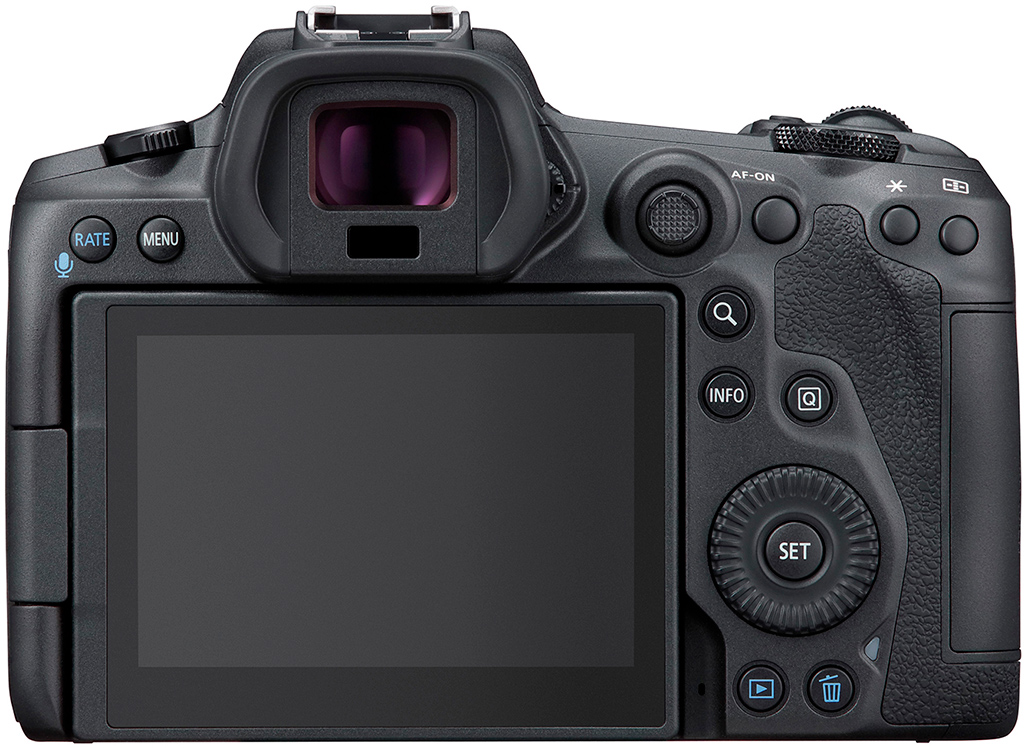
- First of all, a big feature from say the 5D range is the swivel rear screen. This made the camera easy to use in awkward positions like very low down as you can manoeuvre the screen so it is easy to see. I even read a review that stated one of the big “game changing” features of the swivel screen was it allows you to take better selfies as you can view the screen whilst taking a selfie – I guess in today’s modern world of “influencers”, that could be a priority?
- I think one of the biggest features for me is the R5 allows focus points across the entire width and height of the full frame which is often a frustration for me on the 5D range, not being able to move outside the centre focus points. I often want to widen the range of focus outside the centre of the screen particularly when shooting portraits on a low aperture and I don’t want to focus then move the camera


- There’s no “live view” any more, the rear screen is on live view all the time. This could present a problem with battery life, but in all the situations I was in, I never had an issue. If you have your eye to the camera, it switches off and also times out automatically after a period
- On the point of battery life, I always always carry and spare and one great thing about the R5 is the battery is the same size as the 5D so if you have one of these cameras, you can interchange or if like me, you have a spare battery, it will work on both cameras so you don’t need to get another one.
- As I said above, the R5 shoots 45 MP images (compared to say 30 on the 5D IV) which allow more flexibility with cropping and still maintaining a high quality image
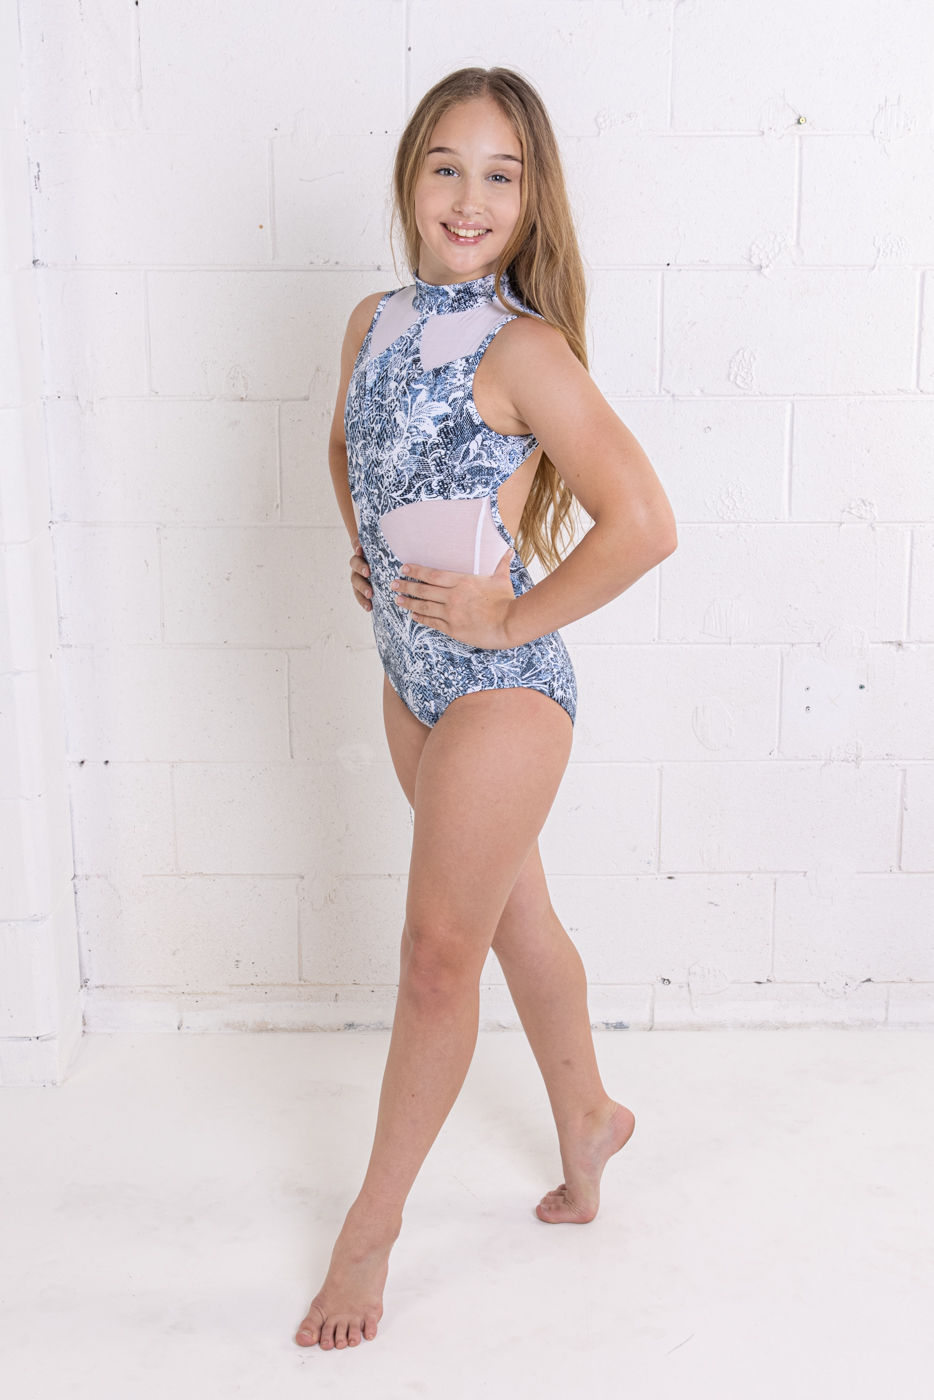
- Another big game changers for me is the eye detect focus. The camera literally has the technology to detect the eye on the person (or animal) and as the object moves, the camera will follow. If there is more than one person, or you are shooting at really low aperture the camera will detect the eye closest to it, otherwise you can easily move the focal point to which eye you want. I did several model shoots and this was a massive bonus for me, made shooting so much easier and the sharpness and accuracy of the image was impressive
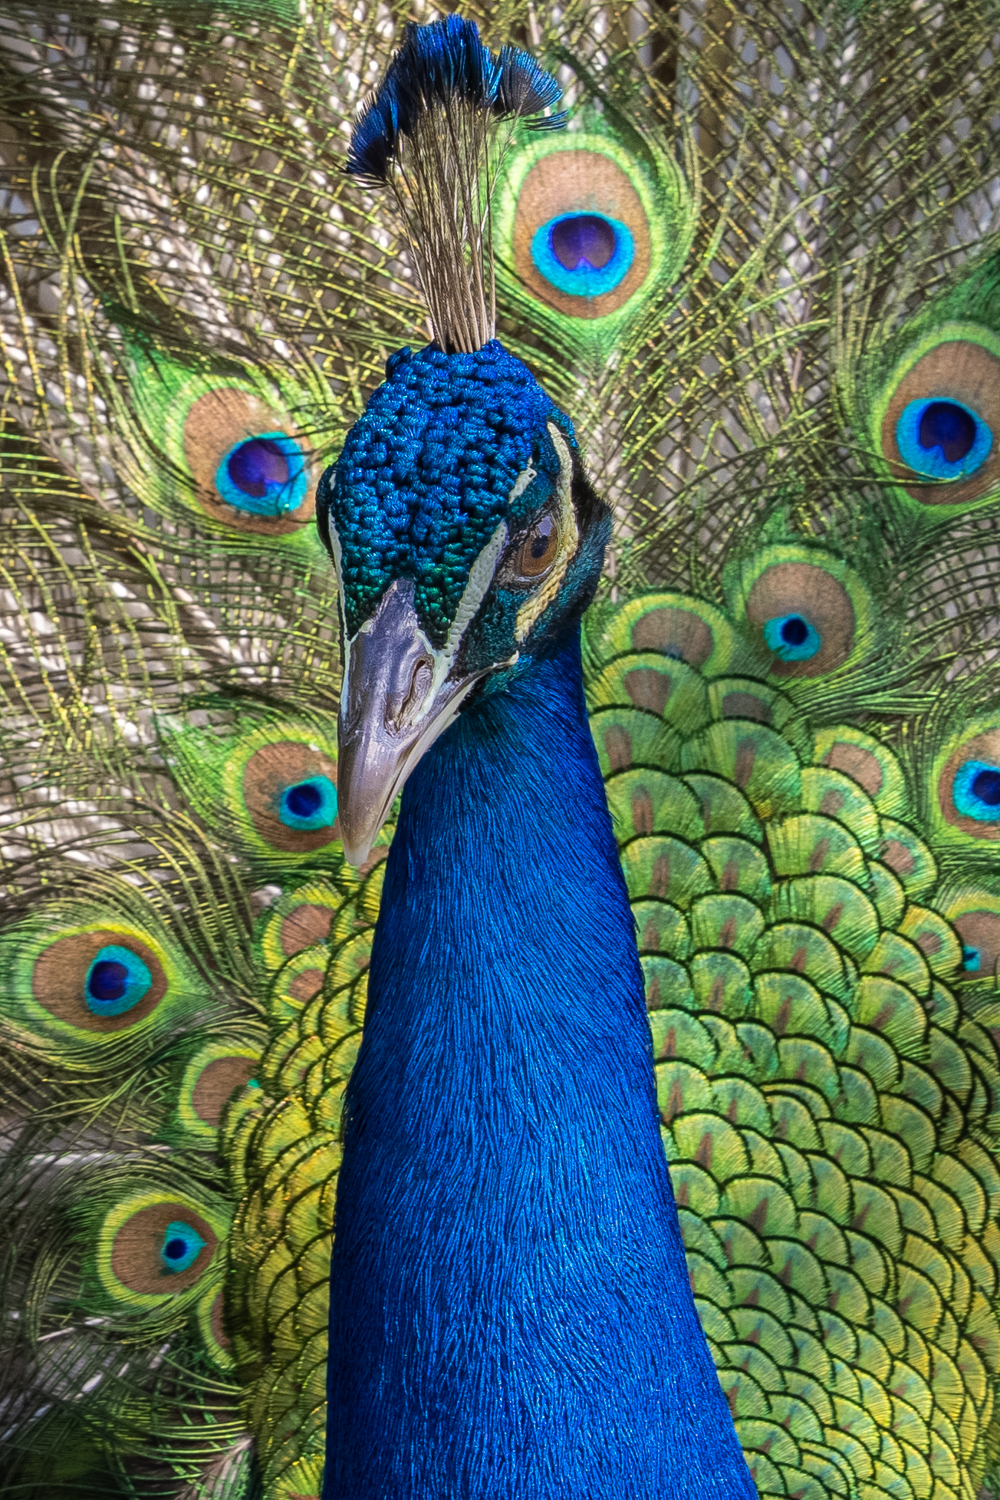
- The animal eye detection was a little less accurate. I shot both peacocks as well as lorikeets at feeding time and both times found that the camera sometimes got confused. However being realistic, animals move a lot faster than humans and there were a lot more to get confused by. I still found it a really accurate focusing method.


- The focusing system does take a little getting used to and I found my method of shooting slightly changed (I changed from rear button focus to shutter button), but after a few days, I found it so much easier.
- You can adjust the focus point using the toggle on the back of the camera as with the 5D or now you can use the rear screen with the “Touch and Drag” feature. It’s a little tricky getting used to, and I recommend you set up to just use the right hand part of the screen (this makes sense once you use) but basically with your eye up to the viewfinder and your right hand holding the camera, your thumb can manoeuvre the screen easily to adjust focus on the move
- You can also set up the rear screen to touch and shoot from the rear screen – although personally I found this annoying and disabled the feature
- The new file format of the R5 is CR3. Make sure your computer has the latest updated software to accept these files (mine didn’t and took a bit of juggling with Apple) so just a tip if you try to download and the computer tells you there are no files or they aren’t compatible.
- The R5 has a new feature called the “control ring”. This is on both the adapter if you are using your DSLR lenses (as an option) or on the RF lenses. It is basically a ring between the lens and the camera body that allows you to adjust various features such as ISO, aperture or shutter speed. It actually is a really cool feature. I pretty much had mine set to ISO and this allowed me to change ISO during a shoot without even taking my eye away from the camera. Be careful though, when you start using it, I had a few instances where I accidentally changed the ISO without realising so it does take a little getting used to.
- As a great way to transition from the DSLR to Mirrorless technology, you can purchase the R5 and get an adapter to use your DSLR lenses. I used the R5 with my L Series 24-70 f2.8 lens. There are two adapters available and I highly recommend paying the extra to get the one with the control ring feature (about AUD $100 extra). It means if/when switching between the RF and DSLR lenses you have the same control ring feature, and let me assure you, once you start using it, it is super handy.
- Even though you can still use a DSLR lens, the range of RF lenses is growing all the time with currently around 15 to select from.
- The camera has a “Q Button” on the back which makes it really easy to make quick adjustments like image style, white balance, autofocus modes, autofocus operation, etc. On the 5D, I have a custom menu set up with these adjustments as these are the most commonly adjusted, so it makes it a lot quicker and easier changing from one button the rear of the camera.
- You get an in camera preview of images shot when you have your eye to the view finder which is really handy when shooting in bright light situations where the rear screen can be a little hard to see.
- The R5 has inbuilt image stabilisation technology meaning it can effectively reduce camera shake up to 8 stops allowing you to shoot a lower shutter speeds hand held
- Interestingly, the shutter release is really quiet so when shooting compared to other models, it’s super quiet. There is even a “silent” mode by which the camera disables the shutter so shooting is virtually totally silent
- Camera definitely feels lighter straight out of the box
- A big difference between the R5 and pretty much every other camera is the video quality – 8K on the R5 which I know is a huge selling point for a lot of people. Let’s be real, video is “the new black”. Everyone is doing it and there is a lot of money to be made. Personally I am sticking to my old school stills, it’s my passion so I’m not interested in the video side of camera capability but if you are, you can’t go past the R5. I have to confess though I was so excited with taking photo’s I didn’t even test out the video on the R5 – sorry.
Price – okay let’s just not go there. It’s roughly double the price of a 5D IV body, which for many people is a lot. But I am constantly asked “what camera/lens should I buy” and my answer is always always the same. “Buy the absolutely the best you can afford”. I think if you buy inferior quality lenses etc, you quickly outgrow them and end up getting the better one anyway, so initially you may save a little money, but it ends up costing you in the long run. This happened to me only once, I bought a non brand lens thinking I could get away with it, and honestly, I was never happy with the quality and quickly replaced it for an Canon L-series. I personally think you are far better off just owning one body and one great versatile lens than trying to get a bit of everything for the same money. So my advice is, if you can afford the R5, it is truly amazing and after testing one out for a couple of weeks, I am absolutely trading in some old gear and upgrading. The other option is to start with the R6 which is around half the price of the R5, with the biggest differences being 8k video vs 4k and 45 megapixels vs 20 megapixels.
SET UP TIPS OUT OF THE BOX (DIFFERENT TO OTHER MODELS)

- Set the camera’s shooting mode to M, Av or Tv
- Shooting menu 1, Tab 1, Set the Image Quality to RAW or JPEG (I’m thinking if you have bought an R5, you only shoot in RAW)
- Autofocus menu, tab 1, subject to detect, pretty self explanatory with People, animals or no priority – you will use this menu a lot to set your focus depending on your shooting scenario
- Autofocus menu, Tab 1, Touch and Drag AF settings, which allow you to use the rear LCD to move the AF point when looking though the viewfinder
- Shoot Menu, Tab 2 When using the touch and drag feature for rear screen focus, you can customise the active touch area. If you are using your eye in the view finder to focus, I suggest you set the area to “right”. This makes more sense when you use the feature, but basically avoids say your nose or face accidentally touching the screen and also as you use your thumb to focus, realistically you only move it across the right half of the screen
- You also have option of “absolute” or “relative” position method. If your subject is stationary, I would recommend “absolute” as it gives precise positioning whereas “relative” moves the focal point relative to the direction your drag on your screen so is more effective for moving objects
So to sum up, for me, this camera is such a massive step up from previous models, I feel like all the hype is totally justified. The absolute clinchers for me are the Eye Detection Focus, the rear screen swivel plus touch and drag focus, the Q menu for quick changes as well as the control ring and finally the expansion of the focus point outside the centre of the image to the full range of the full frame sensor.
If you wonder about why you should step up to the mirrorless technology, there is a definitely size to weight advantage as well as a far greater focusing speed on the mirrorless, which makes taking pictures so much more accurate and easy. Mirrorless is clearly the way technology is heading and Canon have certainly stepped up the bar with the R5.

Thank you Jules. Great review!
Thanks so much Brent. It’s a great camera. Very excited to get my hands on one permanently
Excellent article Jules. Of course I’m already sold on the EOS R line having bought the EOS R earlier this year but the new R5 and R6 cameras are next level. I can’t wait to see what Canon will bring out next.
Thanks Ann. It’s certainly a step up and I love the direction the technology is going
Giselle Lynette, Ghana Mama, Tay Jean Only Fans Leaks Mega Folder Link( https://UrbanCrocSpot.org/ )
Plus, it will provides you a jaw-dropping expertise in YouTube MP3 downloading.